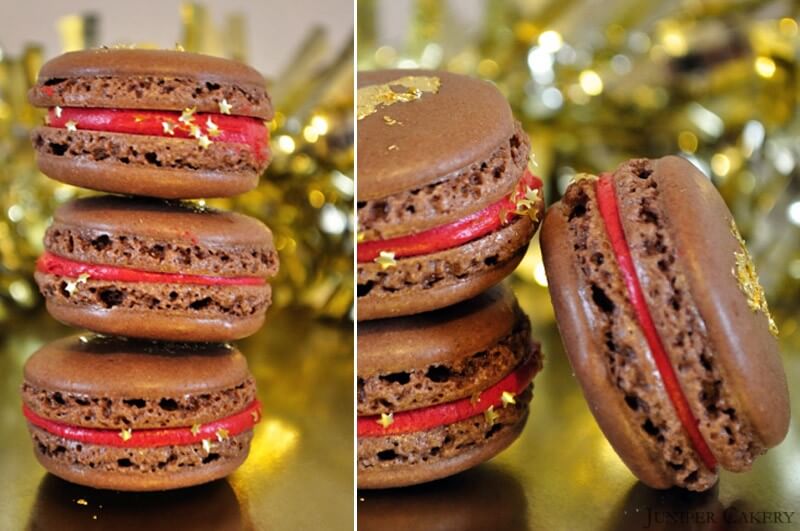
Chocolate Macaron
Here is a fantastic festive recipe for macarons. This is an entry from our friends at the Juniper Cakery. Although macarons can seem tricky to make, with a reliable recipe, they are easily achievable and impressive to serve. Adding cranberry, chocolate AND champagne to this recipe makes these the ultimate Christmas treat!
At this time of the year champagne can find its way into our lives in many forms from various cocktails, indulgent bath sets, and fancy hor d’oeuvres; so why not enjoy some bubbly infused into a delicious macaron or several. These Cranberry, Champagne and Chocolate Macarons have been specially created for The Devilled Egg Kitchen Academy by Juniper Cakery and are wonderfully perfect for New Year’s get-togethers and parties. Be adventurous and assemble them into an impressive macaron tower or topple them playfully onto golden tiered cake stands for a casual yet elegant feel.

Cranberry and Champagne Buttercream
- 100ml of good champagne
- 250g butter
- 250-300g icing sugar (keep testing when adding to make sure it is the consistency and sweetness you like)
- 150g fresh cranberries
- 3 tablespoons caster sugar
- Red gel paste food colour
- Disposable piping bags
- 808 piping tip
Chocolate Macaron Recipe
- 115g finely ground almond flour
- 230g icing/confectioner's sugar
- 144g egg whites (try using Two Chicks egg whites)
- 72g caster sugar
- 2g kosher salt
- 1 heaped tablespoon cocoa powder
- 1 lemon Disposable piping bags
- 808 piping tip
- Good quality thick baking not parchment paper (don't scrimp on this as cheap paper buckles and will ruin the shape of your macarons)
- Pastry/piping bag holder
Method
Step one: Your almond flour needs to be as fine as possible so if you should grind it further before using.
When ready mix the almond flour together with the icing sugar by sifting two to three times.You may have granules of almond flour left in your sieve. If this happens it would be perfectly fine to discard this if it is around one levelled teaspoon’s worth. If you have more try grinding the remaining or using the back of a spoon against your sieve to break it down enough to pass through.
At this stage add in your cocoa powder. To add flavour to the shells try as best as you can to only use dry ingredients (e.g. for lavender grind down edible lavender florets or sprinkle the flowers on top before putting in the oven).
Step two: Wipe down a clean metal or glass (never plastic as plastic soaks in fats which can ruin your meringue) mixing bowl and whisk with lemon juice. The lemon makes sure that any fat and grease disappears. Dry down with a clean cloth.
Step three: Add your egg whites into the mixing bowl and mix on high speed until white and frothy.
With the mixer still on sprinkle in the salt and caster sugar. These stabilise the egg whites so they whip up lovely and firm. Mix until stiff peaks are formed.
If colouring your macarons add the gel paste (never liquid) colour in now and mix until incorporated but never overmix your meringue!
You can test if your egg whites are ready by the traditional method of hold the bowl upside down over your head! If the mix stays put then it’s ready. Macarons can be temperamental so it may take a few practises to get them just right.
Step four: Fold half of your dry mix into your meringue mix gently until the dry ingredients are almost fully incorporated. Once this is done fold the mixed ingredients into the rest of the dry mixture that is left.
Step five: With your pastry/piping bag holder get a disposable piping bag ready and fitted with a plain round tip. The mix at this stage can be fairly runny so you would need to fold the lower/tip section of the bag over to block any mix from running out. Pour the macaron mix into the piping bag.
Step six: Prepare a cookie or sheet baking tray with good quality baking paper (don’t use cheap paper and remember to use baking paper not parchment).
Step seven: Now is the time to pre-heat your oven to Gas Mark 3 / 325 Fahrenheit / 170 Celsius.
Step eight: Carefully pipe your ‘coins’ of macarons approximately the 3.75cm in diameter and around 2cm apart. Get rid of any air bubbles inside your macarons by smacking the tray down on a flat surface around 3-4 times. You should see some holes appear on the tops of some of them; don’t worry about these.
Step nine: We leave our piped macarons to rest before we even think of letting them near an oven. We’ve seen recipes that don’t call for this, but not leaving them for a while has never worked for us at Juniper Cakery. What you need is for your macaron to develop a ‘skin’. We leave ours to sit for 1 hour to 1 hour 30 minutes. We’ve experimented and left them for shorter and longer periods of time, both yielded some not very elegant results. You’ll know that your macarons have a good skin and are ready to pop into the oven when you touch the top lightly and the batter does not stick to your finger. You should feel and see a ‘skin’ has developed.
Step ten: Put your macarons on the middle level of the oven. It is ever so tempting to get as many trays in as you can, but we wouldn’t suggest this unless you’re lucky enough to have a confectioner’s oven. Macarons on the lowest shelf won’t bake as well and macarons placed on the highest will overcook and also discolour.
Step eleven: Bake for 20 minutes turning the tray around halfway. Step twelve: Your macarons should be ready and have ruffled ‘feet’ on the bases of them. Remove the macarons carefully from the paper. Once cooled down these are ready to be filled!
Begin your buttercream by preparing the cranberry and champagne ingredients. In a saucepan on medium to high heat add the cranberries, sugar and champagne together.
Stir as this simmers and the cranberries break down. The champagne should reduce also to around a quarter of it’s original volume.
When ready take off the heat and leave to cool. Once cooled down pour into a blender and blitz until a fine pulp. Now dice the butter into pieces and add half to your mixer. Once the butter is smooth gradually add icing sugar and the remaining butter (also diced into cubes) until you get a smooth, creamy texture.
Add the cranberry and champagne pulp along with some red gel paste colour (we added a little bit of ivory to tone down the red) and mix until incorporated. For more hints and tips see our tutorial on how to make buttercream here.
Using a piping bag fitted with a plain round tip and filled with your lovely cranberry and champagne buttercream pipe half your macaron shells and sandwich together with the other half. For the best macaron experience leave these to sit in an airtight container for around 24 hours. Hurrah! After a gruelling wait of 24 hours you can now enjoy them and serve them to your friends and loved ones. To decorate we sprinkled edible gold star sequins along the sides and dabbed edible glue atop of each and added edible gold leaf on top.